Skip to content


Electric Netting Fence For Pets And Livestock: Setting Up And Troubleshooting
Does your dog love digging under the fence, or do you have chickens that are accomplished escape artists or a flock of sheep that thinks the grass is greener on the other side of the fence? If your traditional fence has left you feeling frustrated and anxious, you’re not alone. But there’s a revolutionary solution that provides peace of mind and a haven for your beloved pets and livestock: an electric netting fence.
Imagine a lightweight, pre-constructed barrier that humanly discourages escape attempts, keeping your pets and livestock safely contained within designated areas without causing harm. Indeed, electric net fences are game-changers for pet owners and farmers alike. It can be used to contain and graze livestock, such as sheep and goats, and poultry. The tall netting fence is more likely to keep out large garden predators such as coyotes, dogs, skunks, raccoons, foxes, etc.
This blog is a comprehensive guide to setting up, maintaining, and maximizing the effectiveness of your electric netting fence. Troubleshooting and escape prevention tips will also be addressed.
Key Features of Electric Netting Fencing
Choosing the right electric net fence is essential for your animal’s safety and your peace of mind. Here are some important features of an electric netting fence:
Portable and easy to set up
One person can put up the electric net fence with little effort or skill. It’s light and doesn't take up much space, so it can be set up and moved quickly without any tools. The fiberglass posts with double spikes are already embedded in the mesh every 11 feet and can be pounded in with a mallet. To make them even stronger, you can use a tool to drive them in further. As an extra safety measure, there are 8 pegs and guy lines at the ends, corners, and bends.
Graduated spacing
The adaptable electric fence offers graduated spacing to provide extra safety. The 18 horizontal strands (14 conductive) and semi-rigid vertical struts are positioned closer together at the bottom and further apart at the top to prevent sagging. To avoid electrical shorts during weed growth, the bottom two strands are not electrified.
Reliable and durable fence netting
Small chicks cannot escape through the electrified poultry fence since the bottom six strands are 3" apart. The 11 conductive horizontal stainless steel wires provide excellent electric safety against predators, keeping your livestock safe within a pasture. Pet & Livestock HQ poultry netting is strong and suited for windy circumstances. You can have peace of mind knowing your chickens are free to roam.
Easy electrification
To electrify your netting, you'll need a fence energizer. The energizer is NOT included in the box. We recommend the Pet & Livestock HQ solar fence energizer. It requires no set-up and can be used anywhere, at any time. For this reason, our electric fence netting is popular among free-range farmers and rotational grazers.
Guide for Installing an Electric Net Fence
1. Prepare the materials
- Fencing wire
- Fence posts
- Post insulators
- Grounding rods and cable
- Wire tighteners and connectors
- Electric fence energiser
- Warning signs (required by law in many areas)
2. Mapping out your perimeter
Before you get started, you must first map out your desired perimeter. Use a measuring tape to identify the exact area you wish to enclose. Now, grab a pen and paper (or a digital tool, if you want) and sketch out your perfect arrangement. Consider strategically placing access points, such as gates for simple entry and exit, and don't forget to designate any potential escape routes your pets or livestock may devise. Next, mark the locations for your fence posts around the perimeter, ensuring that they are evenly spaced (typically 10-30 feet apart) to create a strong and effective barrier. With this plan in place, you're well on your way to building a home that your animals will like and respect.
3. Installation of Posts
Secure the posts at the places that you have marked. Remember, a sturdy fence starts with a sturdy foundation, so make sure the posts are pushed deeply and securely. Don't skip the corner braces; they'll provide extra support and peace of mind. Next, attach the insulators to the posts at the right height for your pet or livestock. Whether it's a playful pup or a curious chicken, make sure they have a clear understanding of the boundary line. Now that the posts are in place and the insulation is ready, you're one step closer to providing your animals with a secure and happy place.
4. Attaching the Fence Wire
Make sure the wire passes through each post's insulators neatly and without any slack. Consider it like giving your animals an electrified clothesline that runs continuously. If it doesn't appear precisely taut just now, don't worry—that's where the convenient wire tighteners come in. Use these tools to make sure the wire is smooth and firm, forming a secure barrier, just like you would when adjusting a guitar string. Lastly, join the wire's two ends to create a full loop, which represents the safe area you've established. You now have a secure and confined area for your pets or livestock as soon as the fence wire is installed.
5. Connecting the Energiser
The energiser, the system's central component, is used in the last phase of powering up your perimeter. But always remember, safety comes first! Make sure you carefully follow the manufacturer's directions while attaching the energiser to the grounding system and the fence wire. Think of it like plugging in a vital appliance—caution and following the manual are vital. Don't forget about the grounding rods; these safely deflect any excess energy away from the fence by acting like lightning rods.
Now that everything is linked, it’s time to put it to the test. To make sure the system is operating correctly and providing a safe output for your animals, use a voltage tester. Always put safety first, and refer to the detailed instructions provided by the system you have selected.
Important Considerations:
- To discourage digging, tiny dogs may benefit from having the bottom section of the fence wire buried.
- Use brightly coloured flags along the fence line to increase visibility for smaller animals.
- Use positive reinforcement to teach your pets to respect the fence's boundaries.
- For larger animals, such as horses and cattle, use sturdier posts and heavier gauge wire.
- Train your livestock to the fence gradually, beginning with a low voltage setting.
- Ensure proper grounding to prevent accidental shocks to animals or humans.
- Integrate the fence into existing structures, such as gates and pens, smoothly.
Troubleshooting Like a Pro: Keeping Your Fence in Tip-Top Shape
Even with the most carefully planned fence installation, problems can happen. Here are some common issues and solutions:
|
Issue/Problem |
Solution |
|
Escapes |
Check for loose wires, gaps around gates, or damage to the fence line. Repair any issues promptly, and consider adding deterrents like flags or visual barriers for smaller animals. |
|
False Alarms |
Vegetation touching the wire or faulty connections can trigger false alarms. Regularly trim vegetation and ensure secure connections to minimize false triggers. |
|
Power Outages |
Consider backup power sources like batteries or generators for extended outages. |
|
Vegetation Interference |
Overgrown plants can touch the fence and create short circuits. Regularly trim the vegetation around the fence line to maintain proper functionality. |
Safety First!
Safety is the most important thing! Keep children and pets away from the live wire, and use caution when handling the fence. Don’t touch the fence while it is being worked on or when the energiser is on. Speak with a qualified electrician or fence installer if you are unable to resolve the issue on your own.
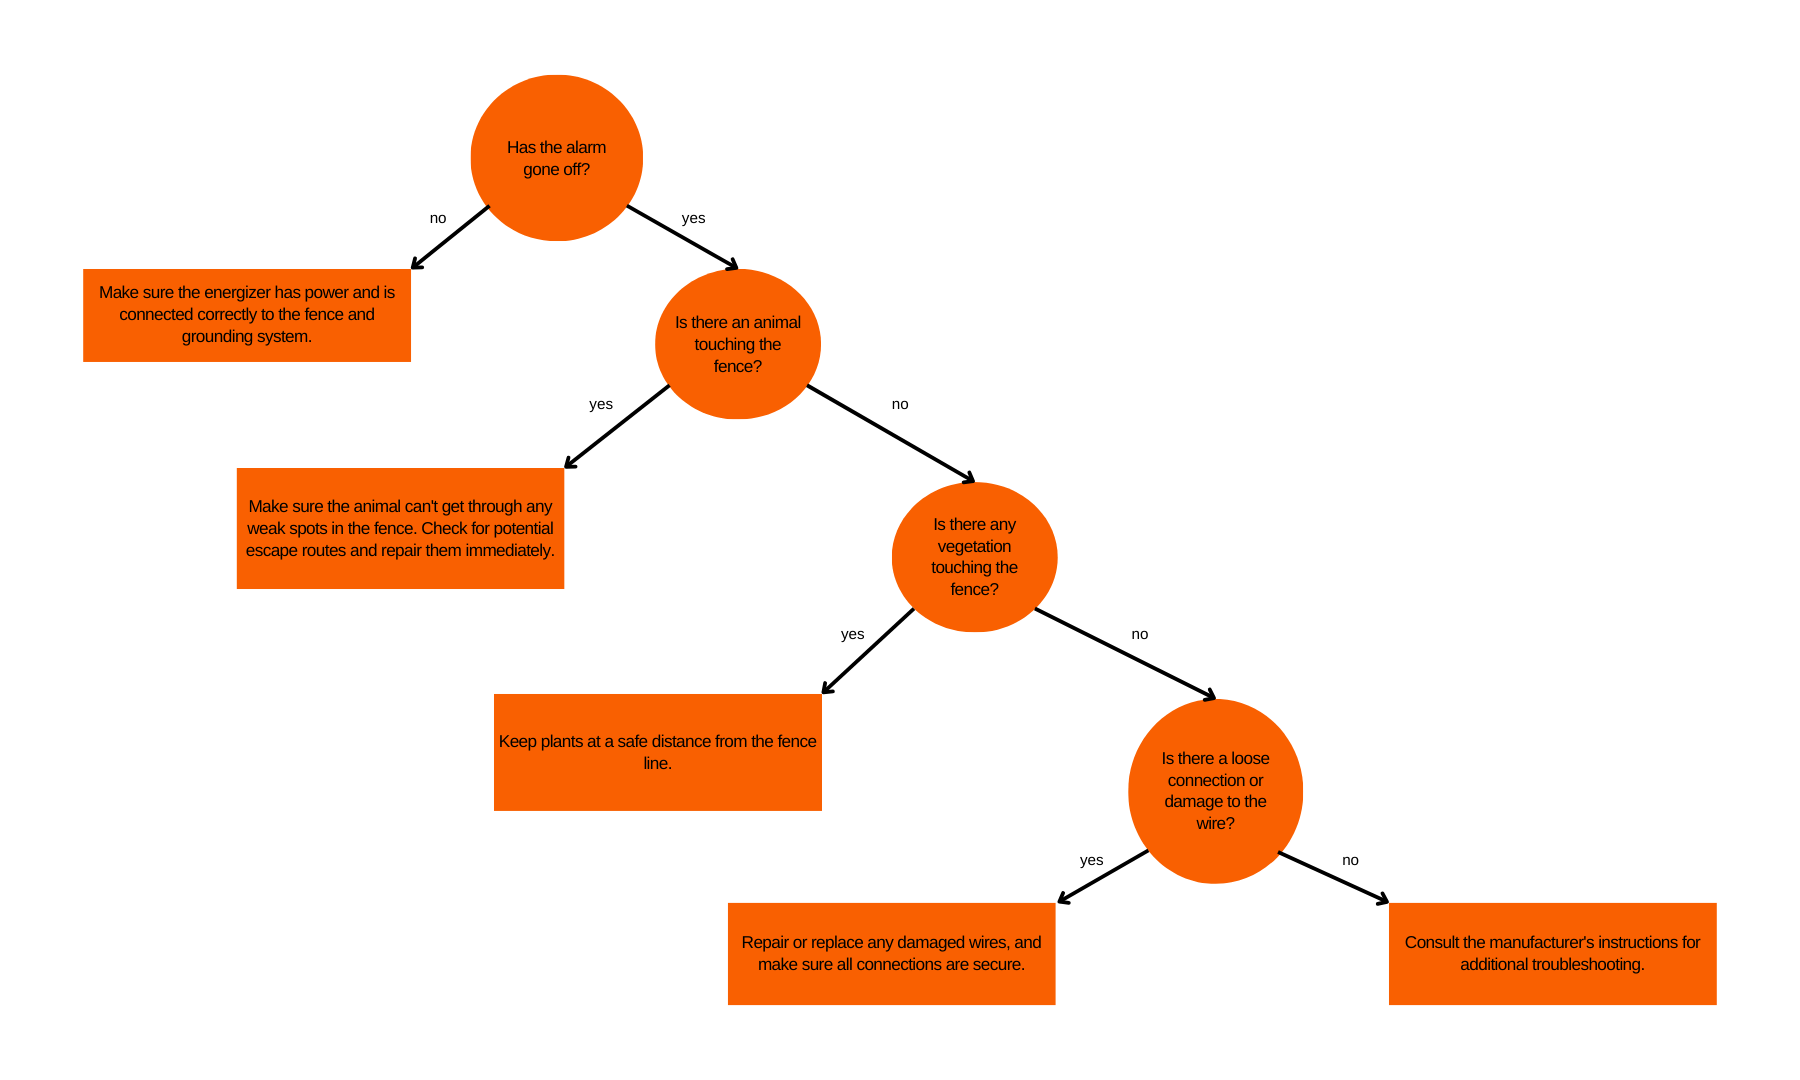
Troubleshooting Flowchart
Follow this handy flowchart to diagnose and solve common issues that you may encounter with the electric net fencing: